Creating a Fiddler extension - part 1 (initial setup)
Fiddler is an application that is used to view, record and manipulate HTTP requests. Fiddler has an extension system that makes it possible to make changes to the UI, create custom inspectors, modify requests and responses, and so on. Extensions can be made in either .NET or in a programming language called FiddlerScript. FiddlerScript is Fiddler’s version of JScript.NET, which is an old .NET implementation of JavaScript. In this post I’ll show you how to create extensions with .NET. More specifically, in C#.
In the first post I’ll explain how to set up the project in Visual Studio and VS Code. In the next few posts I’ll go into detail on how to actually create the extension logic.
Set up with Visual Studio
This is how you can set up a brand new Fiddler extension project in Visual Studio. If you are using VS Code you can skip this part and go down to Set up with VS Code.
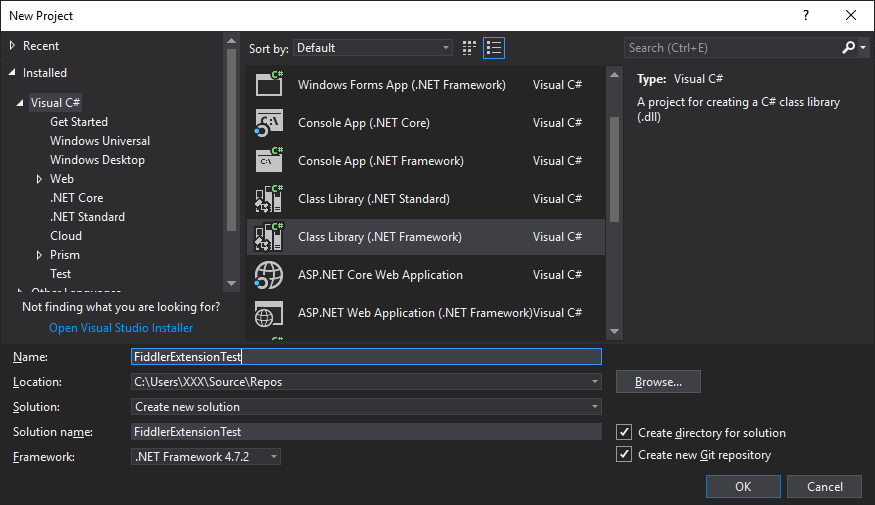
Create project structure
Create a project like you would create any other project. Use Class Library for .NET Framework. You can use the latest version of .NET Framework. In my case, it’s version 4.7.2.
Configure for Fiddler
We have to add a reference to Fiddler.exe. Right click on References in Solution Explorer and then choose Add Reference…. Browse to C:\Program Files (x86)\Fiddler\Fiddler.exe or wherever you have Fiddler installed.
We also have to add a reference to System.Windows.Forms. Go to Assemblies –> Framework and tick that particular dll.
Click Ok.
Right click on the project and choose Properties. Go to the Build Events tab and add the following pre-build event:
taskkill /im fiddler.exe /t /f 2>&1 | exit /B 0
and the following post-build event
XCOPY "$(TargetPath)" "%25userprofile%25\Documents\Fiddler2\Scripts\" /S /Y
This will stop Fiddler before the build starts, and then copy the built dll to the local Scripts
folder. When Fiddler is started again it will have the updated extension loaded. The build events
are optional. Scripts can be replaced with Inspectors if you are making a custom inspector.
The Inspector folder might have to be created.
You can see an example project here.
Set up with VS Code
If you have followed the Set up with Visual Studio section you can skip this part and jump down to Set up extension.
If you don’t have Visual Studio installed you can use the dotnet cli tool that comes with .NET Core. You can download .NET Core here if you don’t have it installed already. Download the SDK. I assume you know what VS Code is. If you don’t, you can have a look at it here. VS Code is not mandatory. It’s just a nice editor that plays well with .NET.
Create project structure with dotnet cli
We can use the dotnet cli tool to create the project. It’s usually used for creating .NET Core projects, but we can edit the project file later to make it use .NET Framework instead.
To create a project called FiddlerExtensionTest we can run the following commands (.NET Core has to be installed):
> mkdir FiddlerExtensionTest
> cd FiddlerExtensionTest
> dotnet new sln
> dotnet new classlib -o FiddlerExtensionTest
> dotnet sln add FiddlerExtensionTest
To change from .NET Core to .NET Framework, open up FiddlerExtensionTest.csproj and edit the following line:
<TargetFramework>netstandard2.0</TargetFramework>
to:
<TargetFramework>net472</TargetFramework>
In this case I use .NET Framework version 4.7.2. You can use other versions, of course. The original target framework could be something else than netstandard2.0, depending on what version of .NET Core you are using.
Configure for Fiddler
Add the following to project file (FiddlerExtensionTest.csproj):
<ItemGroup>
<Reference Include="Fiddler">
<HintPath>C:\Program Files (x86)\Fiddler\Fiddler.exe</HintPath>
</Reference>
</ItemGroup>
<ItemGroup>
<PackageReference Include="System.Windows.Forms" Version="4.0.0.0" />
</ItemGroup>
<Target Name="PreBuild" AfterTargets="PreBuildEvent">
<Exec Command="taskkill /im fiddler.exe /t /f 2>&1 | exit /B 0" />
</Target>
<Target Name="PostBuild" AfterTargets="PostBuildEvent">
<Exec Command="XCOPY "$(TargetPath)" "%25userprofile%25\Documents\Fiddler2\Scripts\" /S /Y" />
</Target>
This adds a reference to Fiddler.exe and System.Windows.Forms. The post-build event is
optional. It will move the extension (which is a dll file) to the local Scripts folder every time
you build the project. Fiddler looks for extensions in that folder, which will make the newly
built dll available to Fiddler. Scripts can be replaced with Inspectors if you are making a
custom inspector. The Inspector folder might have to be created.
Use this command to build:
dotnet build
The dll for the extension should show up in C:\Users\yourusername\Documents\Fiddler2\Scripts automatically. You can see an example project here.
Set up extension
Now that the project structure is set up we can start on the actual code. Fiddler will know a dll is an extension by doing two things. The first is this line on the top of the main file in the project (I renamed the only class file to MyExtension.cs):
[assembly: RequiredVersion("5.0.0.0")]
The version number is the version of Fiddler the extension requires. I picked 5.0.0.0 because 5.0.20182.28034 is the latest version at the current date. You could also target older versions than 5.0. For backwards compatibility with Fiddler 2 you can take a look at this link.
We then have to implement the interface IFiddlerExtension or a interface that inherits from
that interface. Here’s an example:
using System.Windows.Forms;
using Fiddler;

[assembly: RequiredVersion("5.0.0.0")]

public class MyExtension : IFiddlerExtension
{
    public MyExtension() { }

    public void OnLoad()
    {
        MessageBox.Show("MyExtension -- OnLoad");
    }

    public void OnBeforeUnload()
    {
        MessageBox.Show("MyExtension -- OnBeforeUnload");
    }
}
This extension doesn’t really do anything. It shows a message box when the extension has been loaded and a message box right before Fiddler exits. This is only for demonstrating that the extension works. You don’t have message boxes like that in a real extension.
After building you can start Fiddler. If you go to Tools –> Options… –> Extensions, you should see the following:
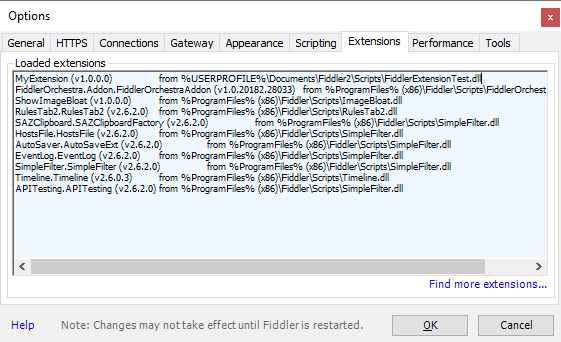
We can see the extension we made in the top of the list. We also see the two annoying message boxes when opening and closing Fiddler.
Interfaces
As seen above, to create a Fiddler extension we have to have a class that implements one of Fiddler’s extension interfaces. These are as follows:
| Name | Description |
|---|---|
| IFiddlerExtension | The base Fiddler extension interface. |
| IAutoTamper | Used to modify requests. Extends IFiddlerExtension. Extension is called for each request. |
| IAutoTamper2 | Extends IAutoTamper. Extension is called when response headers become available. |
| IAutoTamper3 | Extends IAutoTamper2. Extension is called when request headers become available. |
| IHandleExecAction | Extension is called when user enters command into QuickExec box. |
| IRequestInspector2 | Used to create custom request inspectors. |
| IResponseInspector2 | Used to create custom response inspectors. |
| ISessionImporter | Used to create custom session importers. Extension is called when user selects File –> Import Sessions… |
| ISessionExporter | Used to create custom session exporters. Extension is called when user selects File –> Export Sessions… |
I will go into detail on how to implement them in the next few posts. I just wanted to list them here so we get a quick overview of what’s needed for a given type of extension.
Debugging
To debug Fiddler extensions you should first of all turn on verbose output in Fiddler. Type this in the QuickExec box which you’ll find under the list of requests in Fiddler:
prefs set fiddler.debug.extensions.showerrors True
prefs set fiddler.debug.extensions.verbose True
You can start Fiddler when you click Start in Visual Studio by making Fiddler.exe the startup executable. It should look like this in the project’s properties:
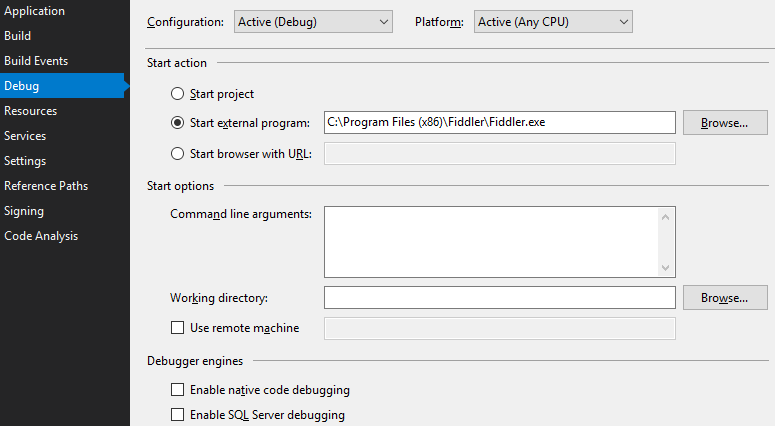
This makes it possible to set breakpoints in the extension or catch exceptions that Fiddler usually swallows. If you use this method you probably want to add the pre-build and post-build events mentioned above.
You can also attach the debugger in Visual Studio to the Fiddler process. This also makes it possible to set breakpoints etc. in Visual Studio. This is done in Visual Studio by going to the Debug menu and choosing Attach to Process…. Find Fiddler.exe and click on the Attach button. You can now debug like you would any other application.
Next
In the next post I’ll show an example of a custom response inspector that pretty prints XML received in the response body.