Creating a Wireshark dissector in Lua - part 1 (the basics)
This post will explain how you can easily create protocol dissectors in Wireshark, using the Lua programming language. This can be useful when you’re working with a custom protocol that Wireshark doesn’t already have a dissector for. If Wireshark looks like this, for example,
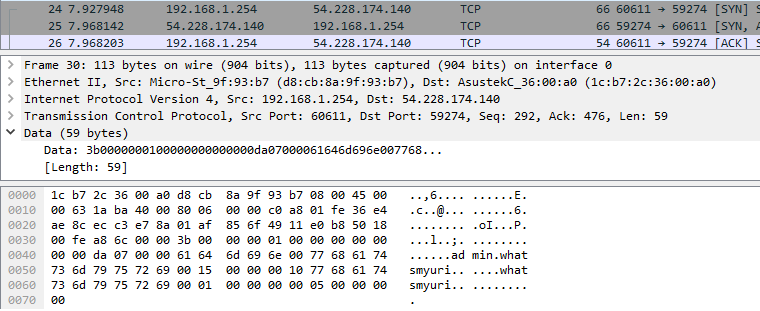
it’s hard to tell what the various bytes in the data part represent.
Wireshark is written in C, and dissectors for Wireshark are generally also written in C. However, Wireshark has a Lua implementation that makes it easy for people who are unfamiliar with C to write dissectors. For those who are unfamiliar with Lua, it’s a very lightweight programming language that is designed to be implemented as a scripting language in applications to extend their functionality.
The downside of using Lua is that the dissector will be slower than a dissector written in C.
Before we start writing the dissector, let’s go through a crash course on Lua. It’s not important to know the language in detail, but we must know the basics.
Lua crash course
- Lua is multi-paradigm, and supports procedural style, functional programming to some degree, and it also has some object-oriented programming features. It doesn’t have classes, prototypes or inheritance out of the box, but they can be made by the programmer.
- It’s dynamically typed.
- Scope is either
localorglobal. It’s global if you don’t explicitly declare it. - Semicolons are not needed. Whitespace is not important like in Python.
- Lines that start with
--are comments. - Don’t use
++or+=. Usei = i + 1instead. - Not equal in conditionals is
~=rather than!=. - Its types are: string, number, boolean, nil, function, userdata, thread and table. Number represents all numbers, both floating-point numbers and integers. Booleans are either true or false. Strings are either single-quote or double-quote. You can forget about thread and userdata.
- nil is a non-value. A variable will have the value nil before it’s assigned a proper value.
- In conditionals: nil and false are falsy, the rest are truthy.
- Lua has a type called
table, which is also the only data structure it has. Tables implement associative arrays. Associative arrays can be indexed by both numbers and other types, such as strings. They have no fixed size and elements can be added dynamically. Tables are often called objects. They are created like this:
new_table = {}
Values are assigned like this:
new_table[20] = 10
new_table["x"] = "test"
a.x = 10                    -- same as a["x"] = 10
They can have functions and are generally very similar to objects in JavaScript.
- Conditional branching looks like this:
if i == 0 then variable = 200
elseif i == 1 then variable = 300
else variable = 400 end
- Loops look like this:
while i < 10 do
  i = i + 1
end
for i = 0, 10, 1 do
  print(i)
end
That is i = first, last, delta. break can be used, but continue cannot.
- Functions are declared like this:
function add(arg1, arg2)
    return arg1 + arg2
end
and are called like this:
local added_number = add(2, 3)
If you see functions called like this:
a:func1()
a.func2()
then the functions func1 and func2 belong to the table (object) a. Using colon is syntactic
sugar for passing the object itself as an argument to the function. That means a:func1() is
similar to a.func1(a).
That’s the important stuff. You can read the Lua 5.3 Reference Manual if you care about the details.
Setup
If you go to Help –> About Wireshark –> Folders, you’ll find all the folders Wireshark reads Lua scripts from. Choose either the Personal Lua Plugins, Global Lua Plugins or Personal configuration folder. E.g. C:\Program Files\Wireshark\plugins\2.4.2 on Windows. The script will be active when Wireshark is started. You have to restart Wireshark after you do changes to the script, or reload all the Lua scripts with Ctrl+Shift+L.
I’m using the latest version available at the time of writing. What I’m doing here might not work on earlier versions.
The protocol
The most interesting protocol to investigate in this post would probably be a custom one that Wireshark doesn’t know of already, but all the custom protocols I’ve worked with have been work related and I can’t post information about them here. So instead we’ll look at the MongoDB wire protocol.
(There is already a Mongo dissector in Wireshark, but I will not use that one.)
According to the specification linked to above, the MongoDB wire protocol is a TCP/IP protocol
using port number 27017. The byte ordering is little endian, meaning the least significant byte
comes first. Most protocols are big endian. The only difference is the ordering of the bytes. If
we had an int32 for example, with these bytes: 00 4F 23 11 in big endian, then the little endian
version would be 11 23 4F 00. This is something that must be taken into account when writing the
dissector.
In this post, I’ll only take a look at the header of the protocol. It looks like this
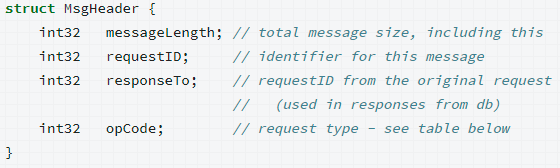
We can see that it has four int32s, each containing 4 bytes, because 4*8 = 32.
Setting up the boilerplate code
Let’s start by setting up some of the boilerplate code that’s needed in all dissectors:
mongodb_protocol = Proto("MongoDB",  "MongoDB Protocol")

mongodb_protocol.fields = {}

function mongodb_protocol.dissector(buffer, pinfo, tree)
  length = buffer:len()
  if length == 0 then return end

  pinfo.cols.protocol = mongodb_protocol.name

  local subtree = tree:add(mongodb_protocol, buffer(), "MongoDB Protocol Data")
end

local tcp_port = DissectorTable.get("tcp.port")
tcp_port:add(59274, mongodb_protocol)
We start by creating a Proto (protocol) object and call it mongodb_protocol. The
table constructor takes two arguments: name and description. The protocol requires a fields
table and a dissector function. We haven’t added any fields yet, so the fields table is empty. The
dissector function is called once for every packet of our type.
The dissector function has three parameters: buffer, pinfo and tree. buffer contains the
packet’s buffer and is a Tvb object. It contains the data we want to dissect. pinfo
contains the columns of the packet list and is a Pinfo object. Finally, tree is
the tree root and is a TreeItem object.

Inside the dissector function, we start by checking the length of the buffer and then returning if it’s empty.
As mentioned before, the pinfo object contains the columns in the packet list. We can use it to
set the protocol name when we receive a packet of MongoDB type. On the script’s first line we set
the name of the protocol to be “MongoDB” (by passing the name to the constructor). We set the
protocol column name here
pinfo.cols.protocol = mongodb_protocol.name
and the protocol column name changes from TCP to MONGODB:
We must then create a subtree in the tree structure found in the Packet Details pane. It’s done by adding a tree item to the tree object that was passed as an argument to the dissector function.
local subtree = tree:add(mongodb_protocol, buffer(), "MongoDB Protocol Data")
The string is the name of the subtree. Without having added any fields it will look like this:

Finally, we must assign the protocol to a port. In my case, I’ll use port 59274, because that’s the port I use to connect to the Mongo database.
local tcp_port = DissectorTable.get("tcp.port")
tcp_port:add(59274, mongodb_protocol)
"udp.port" can also be used, if the protocol uses UDP rather than TCP.
Adding fields
The script already runs at this stage, but it isn’t doing anything useful. For the script to do something useful we have to add the fields that we want to parse. Fields are made by creating ProtoField objects. We can start simply by adding only the first field. The first field in the MongoDB wire protocol specification is the message length, which is an int32.
mongodb_protocol = Proto("MongoDB",  "MongoDB Protocol")

message_length = ProtoField.int32("mongodb.message_length", "messageLength", base.DEC)

mongodb_protocol.fields = { message_length }

function mongodb_protocol.dissector(buffer, pinfo, tree)
  length = buffer:len()
  if length == 0 then return end

  pinfo.cols.protocol = mongodb_protocol.name

  local subtree = tree:add(mongodb_protocol, buffer(), "MongoDB Protocol Data")

  subtree:add_le(message_length, buffer(0,4))
end

local tcp_port = DissectorTable.get("tcp.port")
tcp_port:add(59274, mongodb_protocol)
We add the following above the dissector function:
message_length = ProtoField.int32("mongodb.message_length", "messageLength", base.DEC)
The first argument is used as a label in the filter settings, second is used as a label in the subtree
and the last is used to decide how the variable’s value should be displayed. In this case I
want to show the value in decimal, but I could also use base.HEX to show it in hexadecimal format.
Hexadecimal format doesn’t work for int32 though.
ProtoField has several types of functions we can use: uint8(), uint16(), string() and so on.
We have to use the one that matches the specification. A list of all the functions can be found
here.
We then add the field to the fields table of the protocol:
mongodb_protocol.fields = { message_length }
and finally add the field to the subtree:
subtree:add_le(message_length, buffer(0,4))
I use add_le rather than add, because we are working with a little-endian protocol. If the
protocol was big endian we would have to use add. The function takes two arguments: the field we
made further up, and a buffer range. We can get a range of the buffer by using
the range function that is a part of the buffer object. buffer(offset,length) is the short form
for the range function. buffer(0,4) means we want to start at the first byte, and then take 4
bytes. The reason we want to start at 0 is that we’re dealing with the first field in the header.
We take 4 bytes because that is the size of an int32.
After reloading the Lua script with Ctrl+Shift+L Wireshark should look like this:
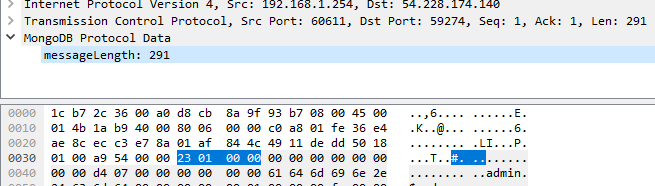
We can see that it parses the messageLength correctly. We can also see that we don’t have to parse all the fields for this to work. We can gradually expand the plugin as we go.
The three other fields in the header are also int32s. We can add them just like we did with the message length field. The final script for this part will therefore look like this:
mongodb_protocol = Proto("MongoDB",  "MongoDB Protocol")

message_length = ProtoField.int32("mongodb.message_length", "messageLength", base.DEC)
request_id     = ProtoField.int32("mongodb.requestid"     , "requestID"    , base.DEC)
response_to    = ProtoField.int32("mongodb.responseto"    , "responseTo"   , base.DEC)
opcode         = ProtoField.int32("mongodb.opcode"        , "opCode"       , base.DEC)

mongodb_protocol.fields = { message_length, request_id, response_to, opcode }

function mongodb_protocol.dissector(buffer, pinfo, tree)
  length = buffer:len()
  if length == 0 then return end

  pinfo.cols.protocol = mongodb_protocol.name

  local subtree = tree:add(mongodb_protocol, buffer(), "MongoDB Protocol Data")

  subtree:add_le(message_length, buffer(0,4))
  subtree:add_le(request_id,     buffer(4,4))
  subtree:add_le(response_to,    buffer(8,4))
  subtree:add_le(opcode,         buffer(12,4))
end

local tcp_port = DissectorTable.get("tcp.port")
tcp_port:add(59274, mongodb_protocol)
We have to increase the offset by 4 in the call to the range function (buffer(offset,length)) in
order to read 4 new bytes for every field. If we were dealing with something other than int32s we
would of course have to increase by something else.
The packet details pane finally looks like this:
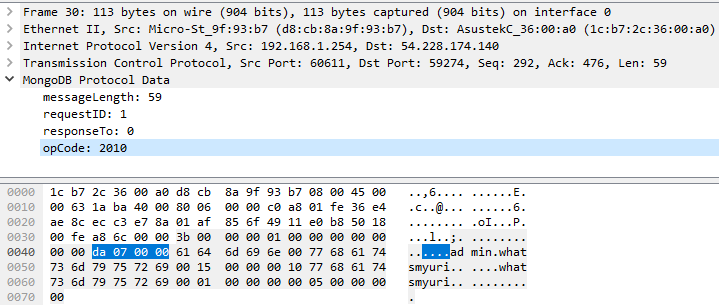
and we are happy for now. In the next part I’ll look at debugging and more advanced parsing methods. Right now, we only see the numeric values of the opcodes, but the opcode name would be more interesting.